Sharing real estate videos to social platforms, especially YouTube, is the number one way realtors can get not just views but leads. Homebuyers love watching videos. With videos they can stay in the comfort of their own home while exploring the inside of a property. In this article we are going to teach you how to create a real estate YouTube channel in 6 simples steps.
With today’s hustle and bustle, not many homebuyers like to attend open houses because of how time-consuming the process can be. Plus, attending an open house can have a lot of first-time buyers feeling out of place and nervous. This is why the popularity of videos has grown for both buyers and sellers.
To share your real estate video, you have to first make a YouTube channel. This is where all your videos will live. In this post, we’ll be going over the steps you need to make a Google Account and create a Youtube channel for yourself. Skip to No. 5 if you have an account.
1. Create a Google Account
You can sign in to all Google’s products like Gmail, Blogger, Maps, YouTube, etc. by creating a Google account. With an account, you’ll be able to like and share videos or subscribe to channels on Youtube. You can still watch videos on Youtube without an account but you won’t have an online presence which means that you can’t create, share and connect to your network on this channel. That’s why creating an account is the first step to publishing on YouTube.
If you already have an account, for example, if you use Gmail, all you need to do is sign in with your username and password.
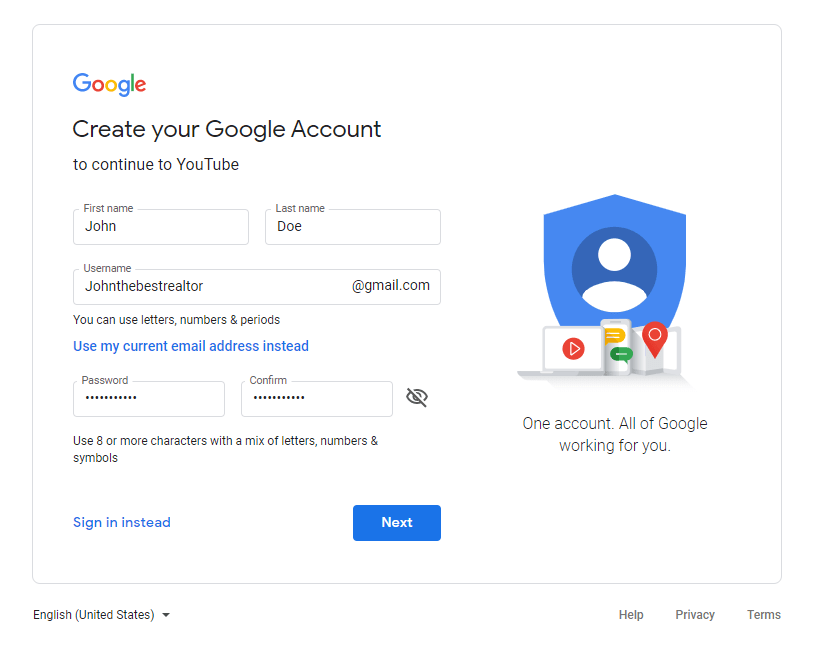
Create a Google account
On the next page, type in your first and last name, choose your email address, a strong password and confirm. Your Gmail will be your username and your ID on Google. So take your time and select your unique username.
Note that you don’t need a Gmail account to create a Google account. If you prefer using other (non-Gmail) email addresses, Just click Use my current email address instead. You’ll be sent a confirmation code to verify your existing email. The rest of the process will be the same.
Once done, click Next.

2. Additional Information
Here, Google is asking for some optional information such as your phone number and recovery email. It’s a great idea to provide Google with either your phone number or a recovery email address for your account security. Just in case an issue arises, such as unusual behavior on your account, Google will contact you through these channels.
Select your birthday and Gender and hit Next.
3. Privacy and Terms
On the next page, you need to agree to Google’s Privacy and Terms. To do so, You need to make sure you know about the terms and privacy, scroll down and hit I agree.
4. Google Account Home
This is your home page. You can see or change your account information such as your personal info, security and payments on the left side.
You can also get access to all the Google products from here. Click the hamburger button on the right-hand corner right next to your logo and you’ll see all the products here in the pop-up window.
All you need to do is click on the red YouTube icon under your account name.
5. Create a YouTube Channel
You need to sign in to YouTube first. So go to the YouTube home page. Click the blue SIGN IN button on the top right corner of your screen. Now click on your name and you’ll see Create a channel on top of your list. Click Create a Channel.
On the next pop-up window, click GET STARTED.
YouTube will ask you to choose how you want to create your channel. Here, you can choose to have a channel under your personal name as a realtor to promote a brand name.
Click Select and you’ll be asked to upload a profile photo and enter more info. You can skip this step by scrolling down and pressing SET UP LATER.
6. Real Estate YouTube Channel – Home
Congratulations! You’ve made your YouTube channel and are ready to upload your video and share it with your network.
Want to know more about uploading videos and ranking higher on Google?
Read our step-by-step guide: How you can upload and post your real estate video on YouTube

